Showing posts with label recipe. Show all posts
Saturday, January 25, 2014

Coconut Chocolate Chip Muffins and Long Run Update

I am forever on the quest for recipes to make fresh baked goods that I can feel good about and get the attention of the little ones.  I recently encountered a day at home with little flour in the house and I wanted to bake something on the healthy side to grab and go between morning runs and out the door.  I realized that there is a whole functionality of my Vitamix that I have practically ignored since I purchased it: grinding flour!  So, I processed my first batch of oat flour by grinding organic oats in the dry container and worked out this recipe for some grab and go muffins.

Coconut Chocolate Chip Muffins
Dry Ingredients
~1 cup oat flour
~1/2 cup coconut flour
~1 cup all purpose or whole wheat flour
~1 tbs aluminum free baking powder
~1/2 tsp baking soda
~1/2 tsp salt
~3 tbs unsweetened coconut
~3/4 cups chocolate chips of your choice
 
Wet Ingredients
 ~1/4 cup coconut oil (melted)
~1/3 cup honey
~3/4 cup full fat plain yogurt
          ~1/2 cup coconut milk (I used full fat)
       ~1/2 cup unsweetened vanilla almond milk
 
Pre-heat over to 425 degrees.  Mix the dry ingredients (except the coconut and chocolate chips) together with a mixer.  Add wet ingredients and beat on low to medium speed until well incorporated.  Fold in coconut and chocolate chips.  Spoon into greased muffin tin and/or use muffin liners (I used silicone muffin liners).  Reduce the oven temperature to 400 degrees.  Bake for approximately 18 minutes.  Remove from oven, let sit for at least 10 minutes
 and then transfer to wire rack to cool completely.  This recipe made 12 regular size muffins and 3 larger size muffins.  Enjoy!
 
The yogurt I used for this recipe is a new product of the farm from where I have been purchasing meat since last April.  It is delicious.  It worked great in this recipe and I have been bringing it to work with frozen pineapple chunks and chopped almonds.
 
As for running, my long run crept up to 9 miles this week and I felt pretty good during the run.  Just about one month to go before this first 1/2 marathon- eeks!  Admittedly, the balance of getting my running done with the little ones, work etc. is harder than I thought it would be.  I feel like I just barely get it all in each week but it's getting done and I am very lucky to be able to do it.
 
How was your week?

Saturday, November 16, 2013

There's What in the Cupcakes???

Beets.  Yes, there are beets in the cupcakes.  As you may recall from my ideas about what to do with all that summer share produce, beets have been a tricky one for me.  First, I don't like them....or rather, I used to not like them.  Second, I find them terribly messy to prepare.  Yes, the color is beautiful but I don't need it all over my hands, the dish towels etc.  I can barely keep up with the cleaning as is.  Lastly, I am the only person in my house who will even attempt to eat beets.  I have failed in all persuasion attempts to the four year old about the beautiful purple vegetable. 

Despite all of this anti-beet talk, I keep reading and learning about how incredible they are for you.  They are high in vitamins and minerals, cleanse the body, purify the blood and even contribute to increased energy and help prevent cancer.  So, I really wanted to like beets.  I put a peeled and washed beet into one of my green smoothies and it was fine...I could get a hint of beet taste but nothing overwhelming.  Then, I read this recipe on Food Babe about beet French fries so I whipped a batch of those up- I enjoyed them and will definitely do it again.  The family has still not joined me with the beets as of this recipe though.

Then there is the recipe that takes the cake...no pun intended.  While reading one of my weekly farm newsletters, I stumbled across a recipe for beet chocolate cake.  Hmmm....never heard of such a thing.  Weeks later, I decided to check out Pinterest for some ideas and sure enough, beets and chocolate seem to be like two peas in a pod.  I gave it a try with this recipe here.  I made a substitution of olive oil for the vegetable oil.  I also would suggest, in the spirit of trying to add more nutritional value to the recipe (if that's what you are going for), to swap out the flour for a white whole wheat flour and swap in some honey or maple syrup for the sugar.  I just didn't have any of these things on hand at the time (except the olive oil) and I had a pile of beets to use.  As for the beets, I washed them, trimmed the ends off and roasted them in a foil covered baking dish for about an hour.  After they cooled, I used a knife to peel the skins off and then pureed them in my Vitamix with a tiny bit of water added.  The result....quite tasty if you ask me!  I don't taste the beets...just chocolate cake! Yes, this recipe has sugar and should be enjoyed as a treat but it's a nice way to use a vegetable and hide it on the little ones.  Ok, I may have washed one down as a quick breakfast one day this week but I was in a rush.  I just got this week's farm share basket and guess what?  There are beets and I am prepared this time!

On the running front, I am finishing out week 3 of my 16 week half marathon training plan.  So far so good.  My "long" run is up to 6 miles.  Although still chugging along significantly slower than pre-pregnancy, it feels great to see some miles start to add up and feel like a runner.  I have been splitting my runs between the gym treadmill or outside early in the mornings.  I like running outside, but I am not a fan of needing a head lamp.  Even though the lamp provides visibility, I feel like I still can't distinguish uneven pavement very well and just don't feel too graceful on the feet.  Anyone else have this issue or is it just me? It's probably just me!  The trusty treadmill is at the gym for me once the icy roads settle in, which is great but I just need to factor in the car warm up time and 7'ish minutes ride there and back.  20'ish minutes is a lot of time in the mornings!

Anyone like running with a head lamp?  Would you prefer to run with a head lamp over the treadmill or vice versa?

Have a great week!
Saturday, September 28, 2013

Loving Fall

 
This is my favorite time of year hands down and we are just a few short days away from my favorite month.  Don't get me wrong- I love a summer beach day, but October's sweater and rosy cheek weather is ah-mazing.  I love the fall fashion.  I love the fall running weather.  I love the fall food.  I love the fall brews. I love the fall coffee. It's all good. 

Like most fall enthusiasts, we headed out for some apple picking a couple weekends ago and of course that brings on some baking and some "oh I need to do something with all of these apples quick" moments.   Once again, thank you to my Vitamix.  I am not a fan of peeling apples.  I was looking at my bag of apples standing in the kitchen one day this week and just decided to wash them, chop them, throw them in and see what happens.  Apple puree in moments!  So, I call this my Lazy Lady's Apple Sauce.

Lazy Lady's Apple Sauce
8-10 apples
1 Cinnamon Stick
1/2 cup brown sugar (optional- or substitute maple syrup)
 
Wash and chop apples into small chunks.  Place in Vitamix or other high powered blender (I had to process my apples in 2-3 batches).  Turn onto low, use the tamper to press the apples into the blender and blend until desired consistency.  Pour apple puree into a crock pot.  Add sugar or other sweetener(optional) and cinnamon stick.  Set on high for one hour and stir occasionally.  Reduce heat to low for an additional hour and stir occasionally.  Let cool and store in a jar or container in the fridge.  As a bonus, this recipe also makes your house smell incredible- no candle required!
 
After I made this, I then searched the internet and my Vitamix books for other recommendations (I should have done that first!).  Vitamix calls for a recipe of adding some lemon juice to the apples while blending and skips the crock pot/sweetener step, which could make for an even quicker version, especially for those who do not want added sweetener.
 
My next fall favorite with my applesauce on hand is overnight oats!  Have you guys heard of these recipes?  A friend of mine told me about overnight oats and then I also came across a bunch of great recipes for them over at My Whole Food Life.  You have to check them out because they are super easy, make a great breakfast on busy mornings or a mid-morning snack at work, taste great and pack some nutrition while keeping you full. 
 
As usual, I never have all of the exact ingredients on hand so I substitute.  There are a ton of varieties you can make once you get going.  Here is a quick base recipe for you to create any of your own flavors or be inspired by the amazing varieties from bloggers such as My Whole Food Life.
 
Overnight Oats Base
1/2 cup oatmeal of your choice
1/2 cup milk of your choice
1-2 Tbs Flavoring
1-2 Tbs Nutritional boost
Fruit
 
I generally use unsweetened vanilla almond milk for my milk choice.  For flavoring, I have used unsweetened cocoa, peanut butter and unsweetened coconut for a decadent version that rivals a dessert and I imagine is similar to these Almond Butter Overnight Oats.  I also used my apple sauce as flavoring for this week's breakfasts and my oatmeal tasted like apple crisp.  For a nutritional boost, you can add things such as flax meal, chia seeds, whey protein powder or wheat germ.  Mix the oats, milk, flavoring and nutritional boost into a jar or container and store in the fridge overnight.  Then you can eat the recipe cold or heat it up the next morning, top with your fresh fruit and enjoy!  I highly recommend sliced banana on the version with unsweetened cocoa, peanut butter and unsweetened coconut- dee-licious.
 
Now that I have rambled on about food, I have a quick running update.  This week was great-  I am on track for a 12-14 mile week with a couple strength workouts in between.  Baby girl had her first spin in the jogging stroller this week too!  I have a couple of 5Ks in mind to get back out there- more on those another time.
 
How was your week?
Friday, July 26, 2013

Lemon Zest Zucchini Muffins & Quick Mileage Update

We took a quick trip to see family at the beach for a couple of days.  Our 4 year old had a ball with her cousins and the wee baby seemed to take to the ocean air and napped like a champ during the day after a walk in the sea breeze....maybe we need to move to the ocean? Ha.  Night time sleeping is still a struggle but all in time I guess.

In preparation for our trip, I put together a batch of muffins for breakfast and snacks.  I had zucchini from our farm share that needed to be used up and I am always game for a recipe that hides vegetables for the kiddies.  These were easy to throw together and quite tasty with a hot cup of coffee...especially while listening to the ocean.

Lemon Zest Zucchini Muffins
Dry Ingredients
1 1/2 cups white whole wheat flour
1 1/4 tsp baking powder
1/2 tsp baking soda
1/8 tsp salt
 
Wet Ingredients
1- 1 1/2 cups shredded zucchini
2 eggs
3/4 cups honey
1/4 cup coconut oil
zest of 1 lemon
 
Pre-heat oven to 350 degrees and grease a muffin pan.  Shred or process zucchini in a food processor until finely shredded.  Mix all wet ingredients together and zest the lemon into the wet ingredients.  Mix again.  Stir together all of the dry ingredients.  Add dry to wet and mix thoroughly. Scoop into the muffin tin (I use an ice cream scooper).  Bake for 18-20 minutes or until a knife comes out of the muffins clean and tops are slightly golden.  Let cool in the muffin tin before removing and enjoy!
 
 
  And on the running front I bumped up my mileage from the whopping 4.1 miles last week to 7 miles this week! We are heading in the right direction! 
Thursday, July 18, 2013

"Running," a Mild Case of Amnesia & Ice Cream!

Time is flying by!  I can't believe we are creeping up on the end of July and my new little girl is already 5 weeks old.  Overall, things are going well.  Baby is growing healthfully.  The big sister is having a great summer and I am getting into the swing of things of being mom to 2.

One of the things I looked forward to for me is my return to running.  While pregnant, I only kept up jogging until about 22 weeks and then kept cardio to the elliptical, walking and spinning.  I know ladies who kept up running right until delivery, which I think is awesome.  It just wasn't comfortable for me between a high heart rate and a lot of pressure from the growing baby.  I also had not been running as regularly as usual when I found out I was pregnant.  As delivery got closer, I was constantly day dreaming about running again.  My vision was that of a mom going out jogging in between feedings. I would be up to 4 or 5 runs per week of 3 miles each by now with strength workouts in between.  I would be glowing with endorphins and relaxed.  This is where my mild case of amnesia comes in....how did I forget so much about a newborn in just four years??

I forgot that the estimate of feedings every 2 hours does not mean that one has 2 hours of free time once a feeding is finished (what was I thinking?).  Newborns feed more often than every 2 hours, especially in the first month.  When I have gone out for a jog, I have jogged for 15-20 minutes, returned home, taken a disgustingly quick shower and the baby is past ready for a feeding right then and there- not 2 hours after the last feeding.  Or there are the times when feedings just blend into each other :) I knew there would be little sleep, but I guess I forgot exactly how that feels after a few weeks.  And I guess my husband still has his regular work schedule to contend with. What do you mean you have to go to work right now?  I just got the baby down, the big sister is happy and fed- I can go for a jog NOW and only NOW.  I laugh.  Ok, I may have cried at least once too, but all of the important things are going well, which is what counts. I may have given out more TV time and nutella sandwiches to the big sister over the last few weeks than any mom would want to admit, but the kiddos are healthy and we got our first smile this week from bundle #2, which makes everything in the world just right...at least for a moment :)

My weekly mileage last week was 4.1! Woo hoo....Not the 12'ish miles I thought it would be and I know 4 miles is many runners' warm up/cool down of one of their weekly workouts, but I get out there when I can and am striving for more mileage each week. Pace? Slow but I am concentrating more on time out there at this point.  As for the strength workouts, I do better squeezing those in as I can just drop to the floor with my weights and calisthenics for 15 minutes at a time without having to worry about timing childcare etc.  And boy do I need a crash course in pushups!  Every little bit helps, right?

Moving onto summer fun, the recent heat waves bring about cravings for one of my biggest weaknesses: ice cream!  I love ice cream but do not love the paragraph of ingredients on the back of most brands of ice cream available.  I have been following sites like 100 Days of Real Food, My Whole Food Life and Food Babe and they all have posts of recipes of their own ice cream.  I finally took the plunge with a recent birthday gift and bought my very own ice cream machine and it was worth it! 
Source
Except mine is in red!
 
This thing is dangerous....a house with no ice cream to be tempted by can have fresh ice cream galore within 15-20 minutes.  Seriously, it's awesome.  Get one if you don't have one.  Oh the recipes to come up with.  So far, I have made a simple vanilla ice cream and my favorite is this recipe over at the Detoxinista.  This was my first use of coconut milk and it made this chocolate ice cream heavenly and rich.  Confession: It did not last as long as it should have in our freezer and I can't blame family.
 
So there you have it.  Any home made ice cream tips for me?  Tips for short workouts that are effective?  Have a great week.

Thursday, June 20, 2013

Happy Feet

There are these feet....happily decked out in my new Brooks running sneakers.
 But more importantly, there are these feet!
 Bundle #2 came along last week healthy and happy (except when hungry, wet or tired of course) and it's a girl!  Another beautiful little girl- all 8lbs 9oz of her joined us 1 day after my due date.  It is safe to say that she was not premature based upon her birth weight.  Bundle #1 is super excited to have a little sister.  In fact, she was saying all along that she wanted a sister...so much to the point that I kind of started to worry how she would react if it was a boy.  It all worked out!

Everything is going well and as expected after the arrival of a new little one.  Not much sleep but it's temporary (or so I try to tell myself repeatedly).  Delivery recovery is going pretty much by the book thankfully.  I felt like I had been hit by a truck the day of and first few days afterwards, but things are looking up.  In fact, I stepped out for my first post partum jog yesterday on day #9.  I only covered a mile and paced myself super slow with the dog, but it just felt good to break a sweat and get out there with my new sneakers and thoughts of the miles to come :)

Yesterday I got a little bit ambitious in the kitchen during the wee one's snooze.  I know everyone says to rest when baby does, but I am horrible at sleeping during the day...especially when the sun is out.  I have so much respect for people who work nights!  Anyway, I was inspired by this recipe for a quick snack to keep ready in the fridge.  These also highlight my love for all things chocolate, unsweetened coconut and peanut butter.  They also require zero, yes zero, baking.  How can you not enjoy?  I threw in some chia seeds also, even though the recipe did not call for them, just for an extra something.  Here they are...give them a try- they are super easy to make and well worth it!

 
Do you have any suggestions for resuming fitness post partum?
 
Have a great week!
Monday, May 27, 2013

To the Peanut Butter and Chocolate Lovers of the World.....

I am always on the hunt for recipes that can accommodate my sweet tooth but not leave me full of guilt and processed garbage.  Today, I scrambled through my pantry and came up with my version of some chocolate, peanut butter squares.  They were super easy.  You can substitute different ingredients and they took care of my sweet cravings, which are tough to beat. 

Chocolate Peanut Butter Squares
For the crust:
4 cups Trader Joes Whole Grain "Cheerios"
(I am sure you could substitute whole wheat pretzels, crackers or even nuts of your choice)
3 Tbs butter
 
For the middle:
1 cup peanut butter
1/2 cup honey
2 tbs coconut oil
 
For the chocolate topping:
2 cups chocolate chips of your choice
1/2 cup milk of your choice (I used organic chocolate soy milk)
Unsweetened coconut (optional)
 
Line a 9 x 13 baking dish with parchment paper (If you would prefer thicker squares, you can use a smaller, square baking dish).  Pre-heat oven to 350 degrees.  Prepare the crust by processing the dry cereal in a food processor or high speed blender until crumbs.  Melt butter.  Mix crumbs and butter together in a bowl.  Press into baking dish and bake in oven for 7-10 minutes just to set the crust. 
 
While the crust is setting, melt the peanut butter, honey and coconut oil in a small pot on the stove top.  Once crust is ready, pour and spread the peanut butter mixture over the entire crust.  Next, melt the chocolate chips and milk in a pot on the stove top and pour and spread over the entire crust and peanut butter mixture.  Throw some unsweetened coconut flakes on top of the chocolate mixture (optional) and place the entire pan in the freezer for approximately 1 hour or until set.  Once set, cut into squares and enjoy!  Store in the fridge and restrain yourself from eating the batch in one day.
 
 
Sunday, April 21, 2013

An AMAZING Milkshake!

Since getting my Vitamix, I have seen numerous recipes and ideas for ice cream using frozen bananas instead of cream & sugar.  Honestly, I was skeptical.  I figured it would beat a craving but taste like a healthy alternative to a total chocoholic like me.  My little one loves chocolate milkshakes and I picked up a carton of chocolate almond milk recently at the grocery store when she began asking for chocolate milk and it appeared to be the healthiest option at the store.  Milkshakes were just the thing we needed on a recent warm afternoon and this was so easy and delicious!

Chocolate Milkshake
(makes 2 servings)
~2 bananas
~2 cups chocolate almond milk
~2 tbs peanut butter
 
Cut the banana into chunks, place into a covered Tupperware or freezer bag and place into the freezer until frozen.  Pour 2 cups of chocolate almond milk into the blender, remove bananas from the freezer and add to the blender.  Add peanut butter.  Secure the lid and turn the blender onto low.  Use the tamper, if necessary, to push the frozen bananas down towards the blades to be blended.  Turn to high until you get the desired consistency.  This took only seconds with the Vitamix.  Pour and enjoy!
 
 
This shake was seriously amazing.  I think it rivaled a Friendly's Frappe and the frozen bananas added just the right amount of sweetness and thickness to the shake without any junk.  You can polish off the whole thing without a shred of guilt. I have seen posts on other blogs such as My Whole Food Life recently with information as to how to make your own almond milk, which I am sure would kick the health factor up a notch.  I may give that a try sometime.  I am definitely going to stockpile bananas in the freezer to make different flavors of this banana based shake all summer long....just wait until berries are out in season!  I bet this recipe could be frozen into popsicle molds too....ideas!
 
Have a safe and wonderful week!
 

Saturday, March 30, 2013

Veggie Stuffed Peppers

I stumbled across a beautiful picture on Pinterest of veggies, quinoa and feta stuffed peppers.  They looked delicious!  On a recent Sunday, I took advantage of extra time in the kitchen to whip up my own version based on ingredients I had on hand (which is never a match to any recipe I find!) and enjoyed a lunch in peace and quiet while my little one napped.  This recipe was easy and tailored for messy cooks such as myself :)  It is also a recipe where you don't have to worry about exact measurements.  Like garlic? Add more.  Hate cilantro? Don't use it.  Vegan?  Ditch the cheese.  Want meat? Add some! There are so many variations that could be delicious, but here is what worked for me:  
 
Veggie Stuffed Peppers
(makes 3 servings)
~1 chopped tomato
~1-2 generous handfuls of spinach
~1 cup of canned (rinsed) or cooked black beans
~1 cup cooked brown rice or quinoa or a combination of both
~1 cup shredded cheddar cheese
~1 clove of garlic or 1 tsp minced garlic (you can add more if you love your garlic)
~1 generous shake of dried cilantro flakes (hopefully fresh cilantro once this winter kicks it!)
~2 tsp cumin
~olive oil to grease a skillet
~3 bell peppers
 
Slice the tops off of the 3 bell peppers and remove the cores and seeds.  Set aside.  Generously coat a deep skillet or cast iron pan with olive oil and heat on medium heat.  Once heated, add the garlic.  Let the garlic simmer for 1-2 minutes and then add the chopped tomato and spinach.  Stir the vegetables so they evenly cook and get coated with the garlic and olive oil.  The tomatoes will soften and the spinach will significantly reduce in volume.  Add the black beans and stir.  Add the cilantro and cumin and stir some more (there will be a lot of stirring here!).  Add the cooked rice and/or quinoa and stir to mix completely with the vegetables.  Add 2/3 of the cheddar cheese and mix with the beans, rice/quinoa and vegetables.  Once completely mixed, remove from the heat. 
 
Pre-heat your oven to 350 degrees.  Spoon 1/3 of the rice/quinoa, beans and veggie mix into each of your 3 bell peppers.  Sprinkle the top of the mixture with the remaining 1/3 cup shredded cheddar cheese.  Lightly grease a shallow baking pan with olive oil.  Place the stuffed peppers into the pan and put the tops of the bell pepper back onto the pepper.  Bake for 30-35 minutes.  Serve with some organic white or blue corn tortilla chips and enjoy!  Filling, tasty & healthy!   
 
Served with sour cream and chunks of avocado!
I love adding spinach to stir fry dishes.  First,  spinach can go bad pretty quickly in the fridge so it is a great way to make sure you use it every week without hitting salad overload.  Spinach also drastically reduces in volume when cooked so it is easy to sneak that veggie into a recipe for an additional nutrition boost! 
 
As for quinoa and brown rice, I usually use a combination of the two.  One tip I find super helpful is to cook a big pot of the quinoa/brown rice combo when I am home and store it in the fridge so that there are healthy grains ready to go all week!  I have seen this tip many times over at Fannetastic Food in her amazing recipes and it truly does work.  On a rushed evening, I can quickly stir fry veggies, chicken and spices (such as Curry- yummy!) and serve over the rice/quinoa.  On a rushed morning, I can throw some rice/quinoa on top of a salad or in a wheat wrap with some veggies and Voila! Lunch!  I love tips like that...the trick is just staying organized with them!  Sometimes, the organization can be a challenge!   

Have a great Easter weekend! Plenty of cooking, baking and gathering to be going on over here this weekend!
 
 
Sunday, March 24, 2013

Chocolate Chocolate Chip Banana Peanut Butter Muffins

Well, winter does not seem to be kicking it around here.  Despite the fact that we are officially into spring, the ground is still covered with snow and the forecast predicts potentially more of it on Tuesday. Boo.  I have spring fever.  Next weekend will be Easter....so much for a spring egg hunt!

Here is a healthy but tasty comfort food recipe for a quiet morning with a cup of coffee....if you get any of those mornings! And yes, it's chocolate!

Chocolate Chocolate Chip Banana Peanut Butter Muffins
Wet Ingredients
~2/3 cup peanut butter
~1 mashed banana (you could add another if you need to get rid of some bananas!)
~1/2 cup honey
~2 tsp vanilla extract
~2/3 cup milk of your choice

Dry Ingredients
~2 cups white whole wheat flour
~1/4 cup coconut flour (you can use all white whole wheat flour if you do not have coconut flour)
~1/4 cup unsweetened cocoa
~2 tsp aluminum free baking powder
~1/2 tsp baking soda
~1/2 tsp salt
~1/2 cup chocolate chips

Preheat oven to 425 degrees.  Mix all of the wet ingredients with a mixer.  Add dry ingredients, except chocolate chips, and mix thoroughly.  Fold in the chocolate chips.  Spray a muffin tin and/or use muffin liners.  I used an ice cream scoop to evenly spoon out 12 muffins into the tin.  Place into the oven and reduce heat to 375 degrees.  Bake for 19-21 minutes or until a knife comes out of the muffins clean.  Let cool in the pan for at least 10-15 minutes before removing.  Enjoy with a cup of coffee or cold glass of milk!
 
 
My 3 year old said these were dee-licious! That never gets old.....
 
And congratulations to all those runners out there who had great races over the St. Paddy's Day weekend....I saw some amazing PR's on the race reports! I am still trucking along on the elliptical and spinning bike....11 weeks to go until baby #2 arrives!
 
Have a great week!
 
Sunday, March 17, 2013

Happy St. Patrick's Day!

It's my favorite holiday of the year! Although I will not be enjoying a festive ale or lager this year, we started our day with St. Paddy's Day Green Pancakes over here.  They don't quite fill my heart like a full Irish breakfast, but they are a delicious, festive and a healthy start to the day.  This recipe is a modification of our Sweet Pea Pancakes recipe that quickly became a staple over here.

St. Patrick's Day Green Pancakes
~1 cup milk
~generous handful of kale or spinach
~1 mashed banana
~1/2 cup whole wheat flour
~1/2 cup oats
~1 egg
~1 tsp vanilla extract
~cinnamon to preference
~chocolate chips to preference
In a blender, puree the kale or spinach and milk (you can add greens until you get the color you want).  Mix the dry ingredients (except chocolate chips).  Add the egg, mashed banana and vanilla.  Mix in 3/4 of the milk/greens puree thoroughly.  I did not need to use the last 1/4 of the puree, but you can add if you prefer a less thick pancake.  Fold in the chocolate chips.  Heat a skillet with your choice of oil.  Cook on each side and serve with pure maple syrup.  That's it!  This recipe made enough to feed me and two 3 year olds hungry after a sleep over!
The green would be so much prettier in natural light, but my little one gets up too early!
Saturday, March 16, 2013

Doughnuts and Random Things

I have to give an internet shout out to two recipes that I have fallen in love with.  The first is Chocolate Covered Katie's Homemade Krispy Kreme Doughnuts.  I have actually never been a die hard doughnut fan.  I usually gravitate towards muffins, which can be even worse, despite the unexplained "healthier" connotation the word "muffin" brings. That said, it is quite relaxing on a weekend morning to sit with a fresh baked good and a cup of coffee.  The problem is that I am not so sure that most doughnuts or other "baked goods" that can be purchased would qualify as a "fresh baked good."  I stumbled across one of Food Babe's older posts "Sabotaged at Starbucks" this week.  I could not get the quote "The reduced fat cinnamon swirl coffee cake has over 75 ingredients..." out of my head.  75?  What possible 75 things could be in that cake?  Silly me, I thought the recipe would have such things as eggs, milk, butter, flour, sugar and cinnamon.   I have caved to such things on the run or given in to the doughnut at work for that quick energy pick me up....only to come crashing down and not feel so great afterwards.  Well, this recipe is bliss to satisfy that craving for a sweet, fresh baked something and not feel gross afterwards. 

The first time I made it, I did not have spelt flour or any healthy sweetener substitute so I went forward with the all purpose flour and sugar.  I don't yet have a donut pan so I threw the batter into mini bundt pans and they still came out great.

Delicious!
I made them again this weekend.  This time I used spelt flour and substituted maple syrup for the sugar.  I baked them as "donut muffins" and then topped them with the amazing second new recipe that I found.  This one is from My Whole Food Life and I used the chocolate glaze from her pumpkin donuts recipe.  It is so simple- a small amount of chocolate chips of your choice melted with milk of your choice (I only used approx. 1/4-1/3 cup for my small batch of doughnuts).  Fantastic...simple....no nasty ingredients.  Note: I am also going to need to try that pumpkin donut recipe at some point. 

The only mistake I made was not being patient to let them cool in the pan before removing because I was hungry :)  One of them fell apart so lesson learned!  Wait...they are worth waiting for.  Once I got the glaze on them, I popped them into the freezer for a few minutes to set and done.  The recipe made 6.

Definitely worth a few minutes baking...
Other random things I am loving this week include the avocado, my Vitamix blender and the elliptical trainer.  I used to stay away from avocados because of the reported fat content.  I'm learning differently now and loving them.  More on that another time.  My Vitamix blender is Ah-mazing.  I am starting each day with a handful of fruit and veggie servings thanks to this easy green smoothie recipe that I have gravitated towards:

Green Smoothie
~1 cup water
~2 generous handfuls organic spinach
~1 scoop organic wheat grass powder
~A generous heap of frozen berries
~1/2-1 banana or orange or apple
 
Throw into the Vitamix, turn on low and use the tamper to make sure the produce gets to the blades.  Blend until desired consistency (takes less than 30 seconds every time).  Enjoy!
 
I am sure there are tons of other healthy things that can go into a green smoothie and would love to hear any recipes you want to share!
 
Lastly, the elliptical trainer.  It's my favorite pregnant workout.  I have a spinning bike at home, which is my most used equipment just because of its convenience.  Although a good workout and it keeps the body moving, I psychologically like to see some miles add up and the spinning bike I have does not measure distance.  I'm sure there is something I could buy to set the bike up with mileage measurement, but I've always done my spinning workouts just based on time and I think that works fine and do not want to invest more money in it.  In contrast, the elliptical gives me that quasi-running feel without the bouncing belly and elevated heart rate so I am loving it and comfortably complete 3-4.5 miles per workout.  3rd trimester starts this weekend :)  Where does time go?
 
This weekend some friends of mine are participating in a local St. Paddy's Day 5 mile road race.  Good luck to everyone!  Happy St. Patrick's Day!

Sunday, March 10, 2013

Lemon Coconut "Shortbread" Cookies

I did not realize how much I love unsweetened coconut.  It all started with this granola recipe from 100 Days of Real Food.  Since that first batch, I have been adding unsweetened coconut to breads, muffins, cookies and even pancakes.  It is delicious and adds the taste of a treat without a bunch of nasty stuff to go with it. 

This week, I played around with a couple different types of flours that I do not usually have on hand.  I have been seeing many different recipes with spelt flour, almond flour, coconut flour etc. and my baking has pretty much been reserved to regular all purpose flour or whole wheat flour.  So, I geared up for a baking experiment.  The final product came out with a thick shortbread like texture that is nice to enjoy with a cup of tea...and the hint of lemon flavor is refreshing during what I hope are these last days of winter!

Lemon Coconut "Shortbread" Cookies
~1/3 cup coconut oil
~1/3 cup honey
~2 tsp vanilla extract
~1/3 cup organic milk (you could substitute your own choice of milk)
~zest of 1 lemon
~1 cup spelt flour
~1/3 cup coconut flour
~1/3 cup oats
~1/2 tsp baking soda
~1/2 tsp baking powder
~pinch of salt
~3/4 cup unsweetened coconut
*this recipe made 18 cookies

Pre-heat oven to 350 degrees.  Mix honey, coconut oil and vanilla extract with electric mixer until blended smoothly.  Add milk.  Zest 1 lemon into the wet ingredients and mix again. 

Coconut Oil, Honey & Vanilla "Creamed" Together

Add dry ingredients (except coconut) and mix until well incorporated (batter will be thick).  Fold in coconut.

Drop by rounded spoon or melon baller onto a parchment paper covered cookie sheet.  Use a fork to press down the cookie.  Bake 10-12 minutes.  Transfer to a wire rack to cool.  Brew a cup of tea and enjoy!


I plugged the recipe into the My Fitness Pal app and came up with a calorie count of 108 calories per cookie.  For my next batch, I am going to modify the recipe a little bit and use orange zest and add some dark chocolate chips for that heavenly orange and chocolate combination!
 
And yes, this truly was a baking experiment. I had to work on this recipe a couple of times to get these cookies.  Just to prove it and maybe give you a giggle, please see this photo of my baking follies:
 
It's a good thing I like baking because my first recipe was a flop!
 
As we all gear up for another busy week, let's try to go with the flow, squeeze in those workouts that make us happy and remember this:
 
Funny cartoon I came across this week & had to share!
 
 
Have a great week!

Saturday, February 23, 2013

Movies and Popcorn

Once upon a time, I was a movie buff.  I would make it a point to have seen every "Best Picture" nominated flick before the Academy Awards, read entertainment magazines galore and enjoyed lively arguments discussions about whether or not the Academy picked the best when they selected their winners (as if I was some sort of qualified person to do that).  In graduate school, solo trips to the movie theaters were my escape and stress relief.  The movie theater was about a 2 mile walk away from my Beantown apartment.  It was the perfect distance: 2 mile walk, roughly 2 hours of screen time and 2 miles home feeling refreshed.  I would go to major blockbuster theaters and small independent flick theaters....I sort of miss that stuff now that I am thinking of it.

Anyway, the Academy awards are coming up this weekend and although I am unfamiliar with the majority of films being highlighted and reviewed (I did see Argo though and would recommend it!), movies make me think of popcorn and that is what brings me here today.  Who doesn't love a good movie and some popcorn? 

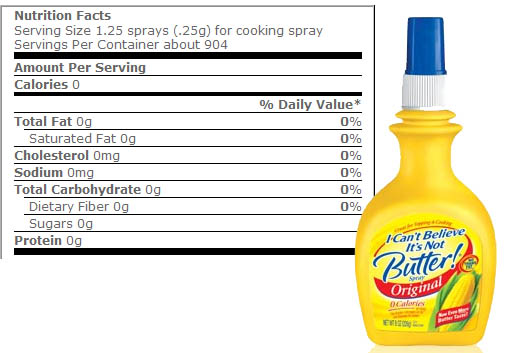
Popcorn can be a healthy, whole food and delicious snack.  Admittedly, I went through a phase where calories or points were really my only focus of "healthy" eating and I was a microwave popcorn fanatic.  I can eat this whole bag for 3 points? Woohoo!  The microwave popcorn bags were in my cupboards, my desk at work and packed for trips home to visit the family.  In addition to the microwave popcorn, my next highly used food accessory was spray butter.  You know, this stuff:


I cringe now when I think about it. 

Yes, I lost weight and got back to a healthy weight but I am confident that I was not putting the healthiest stuff into my body.  Here is a look at the ingredients on a package of microwave kettle corn, which is one of my favorite flavors:

TBHQ?  Argh, that doesn't sound like something I want to inhale at the rate I can devour some popcorn.  Then there is the current controversial information about the chemicals in those bags that potentially leak into the food as we zap them to popped perfection.  Finally, spray butter? What is spray butter anyway?  At zero, yes zero, calories per serving, what is this stuff?  You would be horrified if you saw how I use to hose that stuff onto popcorn, toast, muffins....whatever.  I understand the ingredients are the following:

Water, Soybean(s) Oil Liquid, Salt, Buttermilk Sweet Cream, Xanthan Gum, Soy Lecithin, Polysorbate 60, Lactic Acid, Potassium Sorbate Preservative, Sodium Benzoate Preservative, Calcium Disodium EDTA Preservative, Flavor(s) Artificial Colored With, Beta Carotene, Vitamin A Palmitate

These days, I am back to an old fashioned air popper, which can be purchased almost anywhere for $20-$30.  It's quick, it's easy and most importantly, it just pops those corn kernels without any additives that I will be scared about years later. Also, there is the bonus that little ones enjoy watching those kernels pop out into the bowl!

If you are settling in for the Academy Awards or a movie and enjoy sweet n' salty kettle corn as much as I do, here is a quick real food recipe that I find to be delicious and knocks the socks off any microwave popcorn out there:

Air Popped "Kettle" Corn
~Popcorn Kernels
~1 Tbs Butter (Coconut Oil could be substituted for a vegan recipe or preference)
~1 Tbs honey
~Salt to preference
 
Fill your air popper's kernel hopper with the popcorn kernels (mine takes about 1/2 cup of kernels) and pop the popcorn out into a bowl.  In a small pot, heat the butter (or oil) with the honey until combined smoothly.  Pour over the popcorn, salt to preference, shake up and enjoy!  It's that easy...barely minutes.  Also, you can increase the amount of butter, oil or honey if preferred as the 1/2 cup of kernels does turn into a pretty large bowl of popcorn, but I found this amount to be plenty tasty. 
 
I know that the use of Genetically Modified ingredients is concerning and corn and soy are considered to be the most frequently modified seeds in the U.S.  I understand that you can avoid genetically modified corn seed by purchasing a brand of popcorn kernels that is certified organic and/or has a non-GMO label. 

Settle in for a movie and enjoy!  What are your go-to healthy and fun movie snacks?
 

Saturday, February 16, 2013

Valentine's Day and Chocolate...

Everyone's favorite hallmark holiday has come and gone again this week.  Flowers, sweets, balloons, teddy bears etc. etc. everywhere.  I am not opposed to Valentine's Day but I don't really think it's a big deal either.  We don't plan any big celebrations or outings at our house.  In fact, I would prefer to stay away from restaurants on such a busy night.  I'm not booking a sitter to wait for a table for an hour!  No fancy gifts necessary.  No scrambling for freshly cut roses for this girl. 

Before you conclude that I am a completely miserable and boring person, please know that there is one aspect of Valentine's Day that I adore: chocolate.  I love chocolate.  And when I say I love chocolate, I mean I looove chocolate. I know it's not uncommon to hear of people who love chocolate, but I would say I am a true chocoholic.  I even have a chocolate lab for a dog....and that's not a coincidence.  It's my thing.  It's wonderful.  I have a little bit of chocolate every day, 7 days a week, 365 days each year.  Don't mess with it.  Don't hide my supply.  And whatever you do, do not and I mean do NOT, chow down on the tiny little bit left right before grocery day.  Just don't- trust me.

With my affection for chocolate, I have made it a point to try a large variety over the years.  I have been fortunate to have had the opportunities to travel a decent amount before starting a family.  Over those journeys, I sampled the chocolates of France, Belgium, Canada, Ireland, England, Mexico and even Japan.  If anyone I know is traveling somewhere I have never been and asks if there is anything I would like, chocolate is always the answer- always.  During my travels, I think I judged whether or not I could live in a particular country by my level of affection for their native chocolate.

One disadvantage of these small chocolate adventures is that they may have turned me into a chocolate snob.  Although not a problem for me, this means that my husband can not just run to CVS the night before or day of a special occasion and grab a pretty arrangement of Hersheys.  It's not going to cut it.  No offense to lovers of Hershey bars out there, but I think they are crap.  I was spoiled on a childhood of rich and creamy Cadbury from my native Ireland.  Try some imported Cadbury chocolates and then try to tell me that Hershey kisses are awesome.  I dare you.

So, how does love of chocolate fit into an overall goal of healthy living?  I could cite research that shows the antioxidant benefits of chocolate and other nutrient dense qualities, but I am not going to do that.  Those things are great but truthfully I don't care.  Even if there were no antioxidants or other redeeming qualities, I would still enjoy my chocolate.  Life is too short and this is where I subscribe to a philosophy of balance and moderation. Here are a few things I use to keep my chocolate indulgences in balance and enjoy it completely:

Chocolate can be enjoyed as a whole food.  Oh Yes, it can.   Pure cocoa is a simple, whole food ingredient.  Like everything else, take the time to read the list of ingredients on the product you are buying.  You should be able to pronounce them all, spell them all and memorize them quickly because the list should be short.  It should sound like your mom's pantry, not a chemical cocktail developed in a lab. Enjoy a made from scratch hot cocoa- it takes barely minutes and has 3 ingredients: milk, cocoa and sugar (optional- or you could use less refined products such as honey, maple syrup or coconut sugar).  Easy peasy and delicious.

Indulge in a high quality bar of chocolate, especially dark chocolate. There is a local chocolate shop making their own confections relatively near us.  I do not go there often and I am not claiming that it is health food by any stretch, but it's nice to get a high quality, made from scratch treat once in a while that also supports a local business.  If that option is not available, grocery stores now have decent options of high quality chocolate.  One of my new favorites is Green & Black's Organic varieties.  I won't find these options on sale for 70 cents per bar, but the difference in taste versus a standard candy bar is worth it in my opinion.  Also, it is highly unlikely to devour more than a few pieces at a time when enjoying a high quality, rich piece of chocolate.  It just doesn't happen....even with a chocoholic like me.

Make Your Own Baked Goods. Ok, myself and others who truly enjoy baking have an edge up on this one, but there are a lot of great recipes out there that are pretty quick and simple to create less processed and healthier options for chocolate fixes.  If you are looking for healthy or whole food recipes, check out blogs like Chocolate Covered Katie, My Whole Food Life and 100 Days of Real Food for information at your finger tips.  Some health enthusiasts subscribe to completely eliminating all refined sugar from their diet.  I'm not there yet.  Some people indicate they feel better with sugar completely out of their diet and I respect that.  I do not use refined sugar in the large majority of my baking, but I do not think there is a health risk to enjoying a homemade or freshly made cookie or cupcake for a special occasion once in a while, even if there is sugar in the recipe.  I would much prefer to make that special treat myself, from scratch where I know what the ingredients are versus grabbing a convenience store bought item with an ingredients list like a NASA experiment.

Exercise.  This one may seem obvious but constant moving and activity keeps things in balance.  I'm still looking for a shirt that says "Will Run For Chocolate..."  Anyone know where I can get one of those? 

It also turns out that the apple does not fall far from the tree and chocoholism is an inherited trait.


This little one had a pre-school Valentine's party, which required treats.  So, we had a baking party and whipped up some whole wheat brownie & chocolate dipped strawberry lollipops.

The Whole Wheat Brownies were inspired by Jillian Michael's Master Your Metabolism Cookbook and 100 Days of Real Food. 

Whole Wheat Brownies
 
Dry Ingredients
~3/4 cup whole wheat flour
~1/3 cup unsweetened cocoa powder
~1/4 teaspoon aluminum free baking powder
~1/4 teaspoon baking soda
~1/4 teaspoon salt
 
Wet Ingredients
~1/3 cup honey
~1/2 cup butter
~1 teaspoon vanilla extract (you could substitute peppermint, almond or even orange extract for a different hint of flavor)
~2 eggs
 
Preheat oven to 350 degrees.  In a mixing bowl, stir together the dry ingredients.  In a small pot, melt together the honey, butter & vanilla.  Add the wet ingredients to the dry ingredients, add the 2 eggs and mix with mixer or by hand until well incorporated.  Grease a baking dish and spread the batter into the dish.  Bake in the oven approximately 18 minutes or until a knife or toothpick comes out clean.  Let the brownies cool in the dish before removing.  Cut into desired shapes and indulge!


After some decorations and stickers added by the munchkin.....

 
And this pregnant lady knows what to do with those brownie scraps after cutting out little hearts for the kiddos at school!  Throw them on top of some Stonyfield Organic After Dark Chocolate frozen yogurt and settle in for an episode of Mad Men on Netflix.....bliss.

Do you have any go to recipes for those chocolate cravings?


Sunday, February 3, 2013

The Whole Chicken

By chickens, I am not referring to our hens out back- they are currently on a winter strike- boo.  For the first time in 18 months, I am buying eggs at the grocery store.  I miss my fresh eggs, but more on that another time. I will gratefully take advice from any chicken experts out there! The chicken I am referring to are recipes for cooking a whole chicken.  When I am on my game and plan properly for an upcoming busy week, one of the tips that works best for us is a healthy recipe that translates into multiple nights of meals.  The whole chicken is perfect for this.  Roast chicken is an incredibly delicious, home cooked meal that is really easy to make- really easy.  In fact, I don't even follow a specific recipe for it because it can be varied depending on the spices on hand at the time.  Here are the basics I do follow:
Basic Roast Chicken
~Purchase a whole chicken, preferably organic and noted without the use of any antibiotics or growth hormones;
~Pre-heat the oven to 375 degrees;
~Remove plastic wrap from chicken, rinse the chicken with cold water and remove giblets;
~Grease a roasting pan with olive oil;
~Create your own spice rub with olive oil and spices of your choice.  A simple salt and pepper is just fine or you can add garlic, sage, basil, paprika, parsley....the combinations are endless! Butter also can make a roast chicken fabulous;
~Cover the chicken with your newly created spice rub.  You can also insert a knife under the chicken skin and include some of the spice rub underneath the skin;
~Another delicious option: squeeze fresh lemon juice over the chicken and place the 2 lemon halves right into the cavity of the chicken- the roasting brings out the lemon flavor :)
~Roast the chicken in the oven until the thigh is at 180 degrees- for most roasting chickens I have purchased (4-5 lbs), this takes about 1 hour to 1 1/2 hours (I occasionally baste the chicken with juices while it is cooking).  Also, check for the juices to be running clear and the leg wiggling in the socket easily, which are also signs the chicken is done;
~Let the chicken sit for 10-15 minutes before carving;
~Enjoy! I love this meal with potatoes and vegetables roasted in simple olive oil, salt & pepper.

Just when I thought the whole chicken dinner couldn't get any easier, check out this amazing recipe for a crock pot whole chicken over at www.100daysofrealfood.com. I made this recipe last week and it was perfect.  Once again, I modified this recipe based on the spices I had on hand at the time and I added the lemons.  The chicken came out perfectly cooked, incredibly moist and it made enough food for multiple meals. The multiple meals is the best part about cooking a whole chicken.  Once that bird is done, I try to use the entire thing for options such as:

Ready to start cooking!
~Whole wheat chicken quesadillas
~Chicken Sandwiches
~Chicken Stock & Soup
~Whole Wheat Chicken Salad Wraps
~Roast Chicken Pasta with Garlic and Veggies
~Chicken & Veggie Rice Stir Fry
 
Chicken soup can be frozen if you do not want to use it right away- sometimes that is the best option as the family can give me that "Chicken again?" look.  Freezing it gives me the option for a no-cook night later on...when the family is ready for more chicken.
 
In fitness news, I returned to the pool this week!  I have not swam laps in months.  Truthfully, I was just lacking the motivation to get into the cold pool at 5:30AM during these winter months.  My first return swim was about 1200 yards and it affirmed for me that swimming is perfect cardio when pregnant.  Body temperature stays pretty regulated and feeling weightless is definitely a plus.  I will be working to fit pool time back into the routine on a more regular basis.
 
Do you have any go-to recipes for setting you up for a busy week?
 
Have a great week.
Sunday, January 20, 2013

Our Flour and More Winter Fun

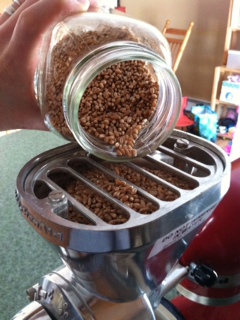
Over two years ago (time flies!), we began to use grain to grind our own whole wheat flour.  We started this process using a manual grain grinder because we didn't feel it was justified to spend a ton of money on this new endeavor when we were not yet sure if it was something that we would like and stick to.  Well, we did like it and came to the realization that we needed something other than a hand cranked grain mill if we were going to keep up with it.  I do love a good workout, but it just wasn't realistic to hand crank the grain mill at the rate we needed flour.  It turns out that cranking 3 cups of whole wheat flour for one and only one pizza dough takes more time than I thought it would.  There are a lot of products out there that are highly recommended, but we settled on the Kitchen Aid Grain Mill that fits with my beautiful red kitchen aid mixer.  It is simple to use.  We store our grain in air tight containers and then dump them into the mill's hopper.
We set the mill to the finest setting to get the smoothest flour possible, crank the motor on and Voila!
Fresh Flour!

We love it.  The mill does work the mixer pretty hard and the manufacturer recommends grinding no more than 10 cups at a time and then giving the mixer a 45 minute rest before using again, which is no problem for our use. 

With fresh flour on hand this weekend, I set out for some baking after I saw the photo from this recipe for Chocolate Chip Spelt Bars over at MsFitrunner.  They looked so good.  I had different ingredients on hand and modified the recipe, which is something I regularly do.  I review recipes and get an idea as to the proportion of wet and dry ingredients, use what works for me and give it a whirl.  These turned out pretty good.  Thus far they are toddler, Mom and Grandparent approved.  Here's the recipe I used:

Chocolate Chip Coconut Bars
~1 3/4 cups whole wheat flour
~1/2 cup wheat germ
~3 tbs Trader Joe's Organic Hemp Protein Powder (chocolate of course)
~1/3 cup honey
~1 3/4 cups organic low fat milk
~1 tbs olive oil
~1 tsp almond extract
~3 small eggs
~ 2 handfuls of dark chocolate chips
~1 heaping handful unsweetened coconut (optional)
 
Mix honey, eggs, milk, olive oil and almond extract in one bowl.  Mix flour, protein powder and wheat germ in another.  Combine the wet & dry ingredients.  Fold in the chocolate chips and coconut.  Spread in a greased 9 x 13 baking dish.  Bake at 350 degrees for approximately 18-20 minutes.  Let cool, cut into bars, enjoy and store the rest in an air tight container in the fridge to grab and go during the week, or you can freeze for later eats!  These bars have a muffin like texture and are a nice treat with a hot cup of tea or coffee.


As for winter fitness, I am not currently training for any particular races and my running mileage is down.  I have been keeping up with spinning and have made it out snowshoeing a couple times the past two weeks, which I love.  It's a great workout for the legs and the hills are no joke either.  I head out to one of our local golf courses and time flies by out there.  It's so quiet and refreshing.  Did I mention I love it?  I just wish there was more daylight so I could fit more of it in.  I think it's a great substitute for running and perhaps I will invest in those snowshoes designed for running some day.  Running on hills in those things has to be an amazing workout! Until next time, here's a shot of my furry training buddy who loves it out there at least as much as I do. Have a great week!


Sunday, December 30, 2012

Winter is Definitely Here

 We have a lot of snow here now....there is no escaping winter this week after two snow storms.  Fortunately, I am someone who enjoys having four different seasons, including winter.  There are frustrations such as a blizzard timed perfectly to require 4:30AM snow removal so we can get to work, but then there are definitely some great things too.  For example, on Christmas morning I had the opportunity to take our dog, a frisky labrador retriever, out for a hike in the woods.  It was beautiful.  We just had a healthy coating of snow and there is a different type of quiet outside just after it snows.  The brisk temperature combined with the peaceful quiet and a wagging tail trotting along with me made for a nice workout and a very relaxing holiday.  The rest of the day was all family and it was wonderful.
 
With the cold weather, some comfort food has been in order this weekend.  On Saturday, myself and the little one prepared a healthy chocolate chip, banana bread.  We threw it in the oven, set our timer and headed outside to play in the snow while it was baking.  When we came in from the snowy cold, here is what was waiting for us: 


For this banana bread, I changed up a banana-blueberry muffin recipe from Jillian Michaels' Master Your Metabolism Cookbook.  I really like this book- it's not just about reducing calories and losing weight.  It's about using whole foods, removing the processed stuff out of your diet as much as possible and highlights so many critical physiological functions that are impacted by processed food.  Here is the recipe I used (I changed it up due to ingredients on hand and my little one's inherited affection for chocolate):
 
Banana-Chocolate Chip Bread
~Pre-heat oven to 425 degrees
-Spray loaf pan with olive oil spray
~1 very ripe banana- mashed
~3/4 cup plain, low fat greek yogurt
~1/2 cup honey
~2 teaspoons vanilla extract
~2 cups whole wheat flour
~1/2 cup wheat germ (you can use all flour if you do not have wheat germ- I just happened to have some and added in the nutritional boost)
~2 teaspoons aluminum free baking powder (Until I read this book, I never knew I had to look for baking powder that says "Aluminum Free.")
~1/2 teaspoon baking soda
~1/2 teaspoon of salt
~1/3 cup chocolate chips of your choice (my favorite is dark)
 
Mix all of the wet ingredients in one bowl.  Mix all of the dry together in another (except the chocolate chips).  Add the dry to wet and mix thoroughly.  Fold in your chocolate chips and spread the batter into your loaf pan.  Place in the oven and then reduce temperature to 375 degrees.  Bake for 35-40 minutes or until a knife comes out clean.  Let cool in pan for at least 10-15 minutes & then slice and enjoy!
 
Stay warm out there!